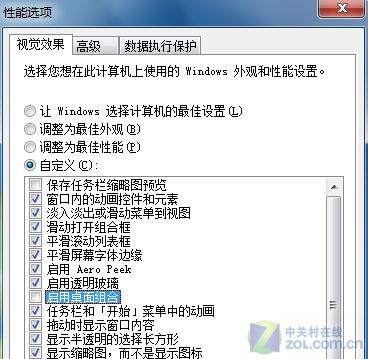
关于Win7关闭任务栏缩略图的方法
由于通过搜索引擎搜索出来的大部分答案都是修改gpedit.msc或者注册表的方式,而且都要重启生效。。。太山寨了。。。给你们介绍正规的方式:
开始菜单 - 计算机 - 右键 - 属性 - 高级系统设置 - ‘高级’标签卡 - 性能 - 设置 - “启用桌面组合”的勾去掉 - 应用 - 搞定!


由于通过搜索引擎搜索出来的大部分答案都是修改gpedit.msc或者注册表的方式,而且都要重启生效。。。太山寨了。。。给你们介绍正规的方式:
开始菜单 - 计算机 - 右键 - 属性 - 高级系统设置 - ‘高级’标签卡 - 性能 - 设置 - “启用桌面组合”的勾去掉 - 应用 - 搞定!


Win10新增了很多快捷键,这儿的文章有比较详细的描述
截图: win+shift+s
我们常常习惯在word右键菜单中找多级列表,因为右键菜单已经有了有序列表(项目符号)和无序列表(编号),为什么没有多级列表?可惜就是没有。
在哪儿呢?以2007为例,在“开始->多级列表”。快捷键 Alt+H -> M。样子像是这样:
参考官方文档:定义新项目符号、 编号和多级列表
转载自 http://www.cnblogs.com/JemBai/archive/2012/05/25/2517783.html
查看linux机器是32位还是64位的方法:
file /sbin/init 或者 file /bin/ls
/sbin/init: ELF 64-bit LSB executable, x86-64, version 1 (SYSV), dynamically linked (uses shared libs), for GNU/Linux 2.6.18, stripped
如果显示 64-bit 则为64位;
file /sbin/init
/sbin/init: ELF 32-bit LSB executable, Intel 80386, version 1 (SYSV), for GNU/Linux 2.2.5, dynamically linked (uses shared libs), stripped
如果显示为32 bit 则为32bit;
uname -a:
uname -a
Linux pmx002..** 2.6.32-71.el6.x86_64 #1 SMP Wed Sep 1 01:33:01 EDT 2010 x86_64 x86_64 x86_64 GNU/Linux
x86_64表示64位机器
uname -a
Linux pmx0..** 2.6.9-5.ELsmp #1 SMP Wed Jan 5 19:30:39 EST 2005 i686 i686 i386 GNU/Linux
i686表示32位机器
i686 只是i386的一个子集,支持的cpu从Pentium 2 (686)开始,之前的型号不支持.
备注:
intel平台包括8086,80286,80386,80486,奔腾系列(1.2.3.4)、赛扬系列,Pentium D系列
以及centrino P-M,core duo 等.
X86_64 适用于intel的Core 2 Duo, Centrino Core 2 Duo, and Xeon 和AMD Athlon64/x2, Sempron64/x2, Duron64等采用X86架构的64位cpu.
PPC 适用于Apple Macintosh G3, G4, G5, PowerBook, and other non-Intel models
安装DVD包括的软件要比安装光盘多一些,安装DVD也包括了两种图形界面(KDE和gnome).
4.Jigdo
也可以通过 Jigdo 下载 Fedora 发行版。Jigdo 可以加速下载安装盘的 ISO 镜像。同 BT 下载等待任务完全完成所不同,Jidgo 自动定位最快的镜像服务器(通过 Fedora 镜像管理器),并且从中下载所需要的文件。为了减少所需的网络流量,可以让 Jigdo 扫描现存的 DVD 或 CD 介质。这个功能对于以下用户特别有用。
getconf LONG_BIT
在32位和64位机器上运行如下命令,结果如下:
[b@002 ~]$ getconf LONG_BIT
64
[root@pmx4 /]# getconf LONG_BIT
32
修改/etc/banner就行了。
装opennms真的是坑多多。。。
需要同时参考下面两个地址:
Installation Guide
Installation:Debian
使用标准的简化快速安装方式会出问题,主要是国内下载太慢。。。
···
deb http://debian.opennms.org opennms-19 main
deb-src http://debian.opennms.org opennms-19 main
···
sudo apt-get update
这儿不得不说第一个坑,默认的内容(如下)更新会遇到问题,所以一定要注意!!!
···
deb http://debian.opennms.org stable main
deb-src http://debian.opennms.org stable main
···
sudo apt-get install opennms
按照 4.2.2. Prepare PostgreSQL 这部分安装,没问题,复制如下:
···
The Debian package installs also PostgreSQL database and is already initialized and added in the runlevel configuration. It is only necessary to start the PostgreSQL database without a restart.
Startup PostgreSQL database
service postgresql start
The next step is creating an opennms database user with password and configure the authentication method.
Accounting and database management for OpenNMS
su - postgres
createuser -P opennms
createdb -O opennms opennms
exit
It is not necessary to change the authentication method in pg_hba.conf, it is by default set to md5 for localhost connections.
Set password for Postgres super user
su - postgres
psql -c "ALTER USER postgres WITH PASSWORD 'YOUR-POSTGRES-PASSWORD';"
exit
The super user is required to be able to initialize and change the database schema for installation and updates.
vi ${OPENNMS_HOME}/etc/opennms-datasources.xml
Configuration for database authentication in OpenNMS
class-name="org.postgresql.Driver"
url="jdbc:postgresql://localhost:5432/opennms"
user-name="** YOUR-OPENNMS-USERNAME **"
password="** YOUR-OPENNMS-PASSWORD **" />
class-name="org.postgresql.Driver"
url="jdbc:postgresql://localhost:5432/template1"
user-name="postgres"
password="** YOUR-POSTGRES-PASSWORD **" />
Set the user name to access the OpenNMS database table
Set the password to access the OpenNMS database table
Set the postgres user for administrative access to PostgreSQL
Set the password for administrative access to PostgreSQL
···
后面记得OPENNMS_HOME位置是在/usr/share/opennms/
Configuration of Java environment for OpenNMS
${OPENNMS_HOME}/bin/runjava -s
看起来没问题,不顾我建议还是改一下/usr/default/opennms文件,内容为:
···
JAVA_HOME=/usr/bin
···
确认一下装了没
sudo apt-get install iplike
使用脚本初始化
sudo /usr/sbin/install_iplike.sh
提示“CREATE FUNCTION”就是装好了。
记住!检查一下你装的是jdk还是jre!jre是会有问题的!
最好再装一次jdk8
sudo apt-get install openjdk-8-jdk
然后
${OPENNMS_HOME}/bin/install -dis
sudo service start opennms
deepin安装后默认是创建的deepin用户,怎么进入root和修改root密码?
其实很简单,用sudo passwd即可,不需要输入旧密码(本来也没有旧密码)
修改其他用户的密码,用sudo passwd username即可。
Windows下著名的当然是wireshark,这个在linux下也有,apt-get install wireshark就可以了,不过需要图形界面才能运行,不适合ssh登录。
ssh命令行下的抓包,就是tcpdump,包很小,1M左右,所以在openwrt下也能使用。
使用参考这篇文章12 Tcpdump Commands – A Network Sniffer Tool
抓指定网口
-i eth0
抓指定协议tcp ip udp
tcp
抓指定目的ip
dst 192.168.0.118
抓指定源ip
src 192.168.0.118
抓指定ip
host 192.168.0.118
抓指定端口
port 80
和、或
host 210.27.48.1 and \ (210.27.48.2 or 210.27.48.3 )
'host 210.27.48.1 and (210.27.48.2 or 210.27.48.3 )'
否
host 210.27.48.1 and ! 210.27.48.2
抓5个包
-c 5
ASCII形式看包内容
-A
16进制看包内容
-XX
看有哪些硬件端口
-D
存到文件
-w cap001.pcap
从文件读
-r cap001.pcap
openwrt 读取系统日志:logread
sudo apt-get install ntpdate
sudo ntpdate cn.pool.ntp.org
可以通过命令上使用
Usage: uci [<options>] <command> [<arguments>]

Commands:
        batch
        export     [<config>]
        import     [<config>]
        changes    [<config>]
        commit     [<config>]
        add        <config> <section-type>
        add_list   <config>.<section>.<option>=<string>
        del_list   <config>.<section>.<option>=<string>
        show       [<config>[.<section>[.<option>]]]
        get        <config>.<section>[.<option>]
        set        <config>.<section>[.<option>]=<value>
        delete     <config>[.<section>[[.<option>][=<id>]]]
        rename     <config>.<section>[.<option>]=<name>
        revert     <config>[.<section>[.<option>]]
        reorder    <config>.<section>=<position>

Options:
        -c <path>  set the search path for config files (default: /etc/config)
        -d <str>   set the delimiter for list values in uci show
        -f <file>  use <file> as input instead of stdin
        -m         when importing, merge data into an existing package
        -n         name unnamed sections on export (default)
        -N         don't name unnamed sections
        -p <path>  add a search path for config change files
        -P <path>  add a search path for config change files and use as default
        -q         quiet mode (don't print error messages)
        -s         force strict mode (stop on parser errors, default)
        -S         disable strict mode
        -X         do not use extended syntax on 'show'
例如查看 lora-app-server服务:
journalctl -u lora-app-server -f -n 50
用户身份认证总是一件绕不过去又颇费脑子的事情。听说出了JWT认证外,还有SAML、SWT等认证方式。这篇文章讲JWT讲得很好,可以看看。
斜杠划分不同的级别,如
“sport/tennis/player1”
井号通配当前级别以下的所有内容
如“sport/tennis/player1/#”匹配:
· “sport/tennis/player1”
· “sport/tennis/player1/ranking”
· “sport/tennis/player1/score/wimbledon”
如果只是一个#,则匹配所有。
加号匹配单级内容
如 “sport/tennis/+” 匹配 “sport/tennis/player1” 和 “sport/tennis/player2”, 但是不匹配 “sport/tennis/player1/ranking”,也不匹配““sport/tennis”
美元符号在发布时放在主题名称前面,用作系统特定的一些消息发布,并且不能被#、+通配符所匹配到。
$SYS/一般用于发布和服务器系统相关的信息
应用不应使用$开头的名称。
查版本命令好多:
···
uname -a
cat /proc/version
cat /etc/issue
···
然而Debian有个发行代号codename,经常影响apt源的使用,怎么查看?
lsb_release -c